


Satin Repair: How to Fix Seams, Tears, Holes and Heat Damage
How do you repair satin?
You repair satin by matching the repair to the damage: re-sew split seams with small, relaxed stitches, stabilise small tears from behind, darn tiny holes, and replace or cover anything that has melted. Use a fine needle and thread that matches the cloth in colour and weight, work with the fabric lying flat, and test every step on a scrap. Satin shows every needle hole and every tight stitch, so the gentlest repair is the best repair.
This guide sorts common satin damage into repairable and not repairable, lists the tools, and walks through the main repairs step by step. It draws on the stitching principles of the Canadian Conservation Institute, which repairs historic textiles, and on the standard description of darning. Where a garment is valuable, old or sentimental, we say so and recommend a professional. For pulled threads, our separate guide to fixing snagged satin goes into more detail.

Why is satin hard to repair?
Satin is hard to repair because its surface is made of long, loose threads called floats, which catch the light, shift under pressure and show every mark. The same structure that makes satin shine makes a poor repair obvious. Our guide to satin floats explains the weave in detail.
- It shows needle holes. A hole made by a needle or pin stays visible on the smooth face, so every stitch must go where it belongs.
- It puckers. Tight stitching pulls the floats out of line and makes the cloth buckle. The CCI says tension causes buckling or gathering, and that it can even break old threads.
- It slides. The slippery face moves under the needle, so the cloth must be held flat and supported.
- It frays. Cut or torn edges unravel quickly. Stabilise them before you sew.
- It does not hide. A mend on a flat matte cloth blends in, and a mend on a glossy cloth throws its own highlight.
What damage can you repair, and what cannot be fixed?
Most seam splits, small tears and loose hems can be repaired well. Melted or burnt patches, large holes and badly frayed areas usually cannot be made invisible. Use the table to decide before you start.
| Damage | Repairable? | Best approach |
|---|---|---|
| Split seam | Yes, usually invisible | Re-sew along the original line with a slip stitch or small running stitches |
| Dropped or loose hem | Yes | Blind hem with a slip stitch |
| Pulled thread or snag | Often | Work the thread back, see our snagged satin guide |
| Small tear | Often, with a visible fine line | Stabilise from behind and couch with small stitches |
| Tiny hole | Sometimes | Fine darning from the back, or a hidden patch |
| Large tear or hole | Rarely invisible | Patch from behind, or replace the panel |
| Scorch, melt or glaze | No | Cut out and replace, or cover with a trim |
| Stain | Not a repair | See our guide to removing stains from satin |
| Worn, shiny or bald patch | No | Replace the panel or cover it |
Stains need cleaning, not stitching. If the damage is a mark, see our guide to removing stains from satin first, and mend afterwards.
What tools and materials do you need to repair satin?
You need fine tools, matching thread and a flat, well-lit surface. The CCI’s Note 13/10, Stitches Used in Textile Conservation, advises natural-fibre or polyester-cotton threads, matching the thread’s colour and weight to the textile, and, for very fine fabrics such as silk, a single-filament thread and a No. 12 needle. It also warns that synthetic threads are often too strong for fragile textiles.

| Tool | Why you need it |
|---|---|
| Fine needles, such as a No. 12 | Fine needles make small holes. The CCI suggests a No. 12 for very fine fabrics such as silk. |
| Matching thread | Match colour and weight. Prefer natural-fibre or polyester-cotton thread, which is less likely to cut the cloth. |
| Fine pins or clips | Pin only in the seam allowance, because pin holes show on satin. |
| Small scissors | Sharp points, for trimming loose ends cleanly. |
| Seam ripper | For opening a seam before you re-sew it. |
| Magnifier and light | Good light makes tiny stitches easier and safer. |
| Scrap of the same satin | To test thread, tension and pressing before you touch the garment. |
| Press cloth and iron | A cloth between the iron and the satin, and the lowest heat that works. |
Test the thread first. Lay a strand across the cloth in daylight, because artificial light can fool you into thinking a thread matches. A thread slightly darker than the cloth usually disappears better than one that is slightly lighter.
How do you fix a split seam in satin?
Fix a split seam by re-sewing it along the original line, working from the wrong side, with small stitches and thread that matches. This is the easiest satin repair and the one most likely to be invisible, because the seam already hides the join. If the seam is under strain, such as a hip or shoulder, reinforce it.

- Turn the garment inside out and lay the seam flat on a clean surface.
- Look for the original stitch line. You can often see the holes of the old stitching. Follow them, because new holes show.
- Align the edges. Pin or clip the two edges together in the seam allowance only.
- Choose the stitch. A slip stitch is nearly invisible on the front and suits seams that must stay flexible. Small, even running stitches suit a straight seam. The CCI describes the slip stitch as nearly invisible on the front and worked loosely to avoid tension.
- Stitch with a relaxed hand. Pull the thread only until the stitch lies flat. Tight stitches pucker the satin.
- Secure the ends. Finish with two small backstitches inside the seam allowance and trim the thread.
- Press lightly. Use a cloth and the lowest heat that works, as described below.
If the seam split because the garment is too tight, mending will not help for long. Ask a tailor to let it out a little, or reinforce the seam allowance with a strip of tape.
How do you mend a small tear in satin?
Mend a small tear by supporting it from behind and securing the edges with the smallest possible number of stitches. The CCI’s stitching note describes a method called self-couching as the most frequently used stitch in textile conservation: a long thread is laid across the damaged area, extending into the stronger cloth around it, and small stitches cross it at right angles to hold it down, staggered so no pattern shows. The principle works on satin, with a fine needle and relaxed tension.

- Stabilise the cloth. Lay the garment flat, with the tear face up, and smooth the floats gently back into line.
- Choose a support. Cut a small patch of lightweight satin or silk, ideally the same fibre. The CCI advises a support fabric of the same fibre as the textile, washed to remove sizing and tested for colourfastness.
- Position the support behind the tear. Keep the grain aligned with the garment.
- Lay a long thread across the tear. Work in a fine thread and extend it into sound cloth on each side.
- Hold it with small crossing stitches. Use as few stitches as possible, stitching through existing holes where you can and avoiding piercing the cloth’s own threads.
- Keep it relaxed. The CCI warns that tension causes buckling and can break weak threads.
- Finish and check. Press gently with a cloth, and check the repair in daylight at several angles.

The mend will be a fine line, not a perfect disappearance. That is normal. A neat, flat repair that supports the cloth is better than an over-worked one that distorts it.
How do you darn a tiny hole in satin?
Darn a tiny hole by weaving fine thread across it in the direction of the cloth’s threads, from the back, using a very fine needle. Wikipedia describes darning as a sewing method for repairing holes or worn spots using only a needle and thread: the thread is anchored at the edge of the hole, carried across the gap and secured on the far side, and enough threads are criss-crossed to cover the hole. The stitches run in rows along the grain, like weaving.
- Fine darning. Wikipedia describes a fine, or Belgian, darning aimed at a nearly invisible repair.
- Invisible darning. Threads are unravelled from a hem or seam of the garment itself and used for the repair. Wikipedia says this suits only very expensive fabrics and garments.
- Needle. The needle must be fine enough to pass between the cloth’s threads. On satin, use a very fine needle, and never force it.
- Hole size. Darning suits very small holes. Larger holes need a patch.
If you are not confident, practise on a scrap of the same satin first. Satin forgives nothing, and a bad darn can look worse than the hole.
What can you do about heat damage on satin?
Heat damage cannot be reversed, because the fibre has melted or scorched. The University of Georgia Cooperative Extension’s Understand Your Fibers page says polyester melts if it is too hot, acetate melts at low heat, and silk can yellow at high iron temperatures. A melted patch is a change in the cloth itself, so no thread will bring it back. Our guide to polyester satin explains how that fibre behaves under heat.
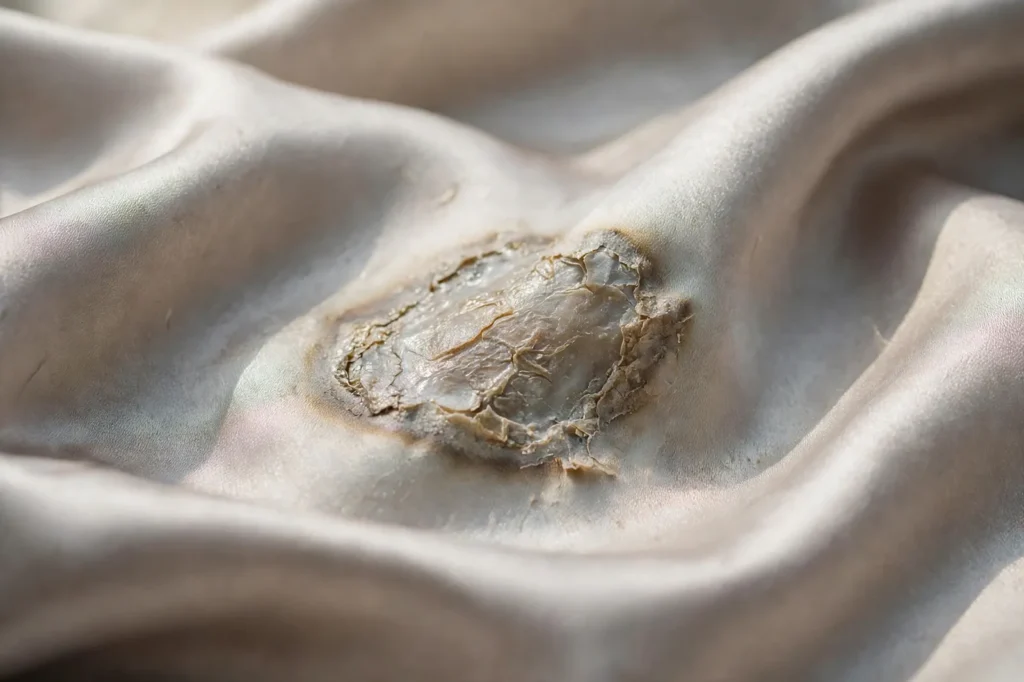
- Cut out and replace. If the damage is on a seam allowance, hem or panel, remove and replace it.
- Cover it. A trim, a patch pocket, a bow or an appliqué can hide a small melted spot on the right garment.
- Move the seam. Re-cut the garment slightly and take out the damaged area, if the design allows.
- Accept and monitor. A small, flat, glazed area on a hidden part of a garment may be left alone.
Prevention is simple. Use the lowest heat that works, press from the wrong side through a cloth, and test on a scrap, as our guide to how to iron satin describes. A steamer held a few inches away is the safest tool.
How do you fix a dropped hem on satin?
Fix a dropped hem with a blind slip stitch, which catches a thread or two on the garment and a few on the hem so almost nothing shows on the front. The CCI describes the slip stitch as nearly invisible on the front and used for blind hemming and for attaching linings, and says it should be worked loosely to avoid tension.
- Press the hem lightly into place with a press cloth.
- Fold the hem edge back a few millimetres.
- Catch one or two threads of the garment, then run the needle through the fold of the hem for about 6 millimetres.
- Repeat, spacing the stitches about 1 centimetre apart, with loose, relaxed thread.
- Check the right side for dimples and loosen any stitch that pulls.
When should you take a satin garment to a professional?
Take it to a professional when the garment is valuable, old, beaded or sentimental, or when the damage is large. A wedding gown, a vintage dress or a silk satin heirloom is worth a trained tailor or a textile conservator. The CCI recommends consulting an experienced textile conservator if you are in doubt, and says treatments on museum objects should be well documented.
- Large tears or holes. They need a patch or a new panel.
- Beaded or embroidered gowns. Beads loosen, and fixing them takes care.
- Heirlooms and vintage silk. Old silk is fragile, and a poor repair can accelerate damage.
- Structured garments. Boning, corsets and linings need professional handling.
- Heat-damaged areas. A professional can sometimes replace a panel with no visible join.
How can you prevent damage to satin?
- Watch your jewellery and nails. Rings, bracelets and rough nails catch floats.
- Avoid rough surfaces. Velcro, zips and wood splinters snag satin.
- Press with care. Heat is the main cause of irreversible damage.
- Store properly. Hang on padded hangers or fold with tissue. Our guide to how to sew satin also explains how to avoid marks when making garments.
- Mend early. A small split becomes a large one if you leave it.
- Keep solvents away. Acetone and alcohol can destroy acetate.
What mistakes do people make when repairing satin?
| Mistake | What goes wrong | Do this instead |
|---|---|---|
| Using a thick needle | Leaves visible holes | Use a fine needle, such as a No. 12 for fine cloth |
| Stitching too tight | Puckers and breaks threads | Keep stitches relaxed |
| Using strong synthetic thread on fragile cloth | Thread cuts the satin | Use natural-fibre or polyester-cotton thread, as the CCI advises |
| Ironing hot | Melts or scorches | Use the lowest heat and a press cloth |
| Repairing a stain | Sews in dirt | Clean first, then mend |
| Skipping the scrap test | A mistake lands on the garment | Test thread, tension and pressing on a scrap |
Should you mend satin by hand or by machine?
Mend satin by hand wherever you can, and use a machine only for long, straight seams that were machine sewn in the first place. Hand stitching gives you control over tension, and tension is the main enemy of satin. The Canadian Conservation Institute’s stitching note treats hand sewing as the routine method for repairing textiles and asks for relaxed stitching, as few stitches as possible and work with the cloth lying flat. Machine sewing pulls the cloth through feed dogs and a presser foot, and satin tends to shift, pucker and mark under both.
| Repair | Hand | Machine |
|---|---|---|
| Split seam, straight | Good for short splits | Good for a long, straight seam if you can match the original stitch length |
| Hem | Best, with a blind slip stitch | Visible stitching shows on the face |
| Small tear | Best, with fine couching and a support | Not recommended |
| Tiny hole | Best, fine darning from the back | Machine darning is faster but more noticeable |
| Large patch | Possible | Possible on a lining or hidden panel |
Wikipedia’s article on darning makes a similar point: machine darning is possible, with running stitches sewn back and forth across the hole and then at right angles, but hand darning is the traditional route to a nearly invisible repair. If you do use a machine, use a fine needle, a small stitch length, a walking foot if you have one, and tissue paper under the seam to stop the satin shifting.
How do you reinforce a repaired seam so it does not split again?
Reinforce a repaired seam by finding out why it split, then removing the strain. A seam that splits once usually splits because the garment is tight, the stitches were too long, or the thread was too weak for the cloth. Repair without fixing the cause, and the seam will fail again in the same place.
- Check the fit. A seam under tension at the hip, bust or armhole may need letting out by a few millimetres.
- Shorten the stitch. Smaller stitches spread the load. Satin seams with long stitches fail early.
- Choose the right thread. The CCI warns that synthetic thread can be too strong for fragile textiles and may cut the cloth, while natural-fibre or polyester-cotton thread is kinder.
- Add stay tape. A narrow strip of lightweight tape sewn into the seam allowance supports a stressed seam.
- Finish the edges. Satin frays, so zigzag or hand overcast the raw edges inside the seam.
- Strengthen the ends. Two backstitches at each end of the repair stop it from unravelling.
How do you tell if a repair has worked?
A good repair is flat, quiet and strong. Check it in daylight and under a lamp, from the front and at an angle, because satin looks different in different light. If the mend shows as a shadow, a pucker or a patch of different sheen, it has not worked as well as it should.
- Look at it flat. Lay the garment on a table. The repaired area should lie as flat as the cloth around it.
- Tilt it in the light. The repair should not throw its own highlight.
- Tug gently. Pull the cloth lightly across the repair. Nothing should open or shift.
- Wear it once. Put the garment on and move as you would in normal use. Check for pulling.
- Check after the first wash. If the garment is washable, a repair that survives the first cycle is secure.
If a repair fails, do not simply re-sew over it. Open it gently, look for the cause and repair it again with finer stitches and more support. A repair that has failed twice usually needs a different approach, such as a patch from behind or a professional hand.
How do you keep your repair kit ready for satin?
Keep a small, dedicated satin kit, because a general sewing box usually holds needles that are too thick and threads that do not match. A satin kit costs very little and saves a damaged garment. Fill it with the items in the tools table above, and add a few extras that make repairs go faster.
- A card of very fine needles, kept separate from your general needles so they do not blunt.
- Thread in the colours you wear most, in silk, cotton or polyester-cotton, as the CCI advises for fragile cloth.
- Scraps of your own satin garments, cut from hems and seam allowances, for testing and patching.
- A small pair of sharp scissors, and a seam ripper with a fine point.
- A press cloth, such as a piece of washed white cotton, for any pressing.
- A note of the fibre content of each garment, so you know how much heat it can take.
Frequently asked questions
Can you repair a tear in satin?
Yes, often. Stabilise the tear from behind with a small support and secure the edges with fine stitches. The repair will usually show as a fine line.
What thread should you use to repair satin?
Thread that matches the colour and weight of the cloth. The Canadian Conservation Institute advises natural-fibre or polyester-cotton thread, and notes that synthetic thread is often too strong for fragile textiles.
What needle should you use for satin?
A fine one. For very fine fabrics such as silk, the CCI suggests a No. 12 needle with a single-filament thread.
Can you fix a burn mark on satin?
Not invisibly. Heat melts or scorches the fibre. Cut out the damaged area, replace the panel or cover the mark.
How do you fix a split seam in a satin dress?
Turn the dress inside out and re-sew along the original stitch line with small, relaxed stitches, and finish with two backstitches in the seam allowance.
Can you darn satin?
Tiny holes can be darned with fine thread woven across the hole from the back. Larger holes need a patch or a replacement panel.
Should you use iron-on patches on satin?
They can leave a stiff or visible patch, and heat can damage satin, so test on a scrap first. For valuable pieces, a sewn repair is safer.
When should you take satin to a tailor?
When the garment is valuable, beaded, old or structured, or when the damage is large. Ask for a tailor who has worked on satin.
Where to go next
For the fibres and weights that decide how satin behaves, see the Satin Database. The Satin Glossary defines terms such as float, selvage and slip stitch, and the Satin Visual Library shows the cloth close up.


