


How to Fix Snagged Satin
# How to Fix Snagged Satin
Quick answer: Do not cut the snagged thread. Push a fine needle through the fabric right beside the snag, thread the loop through the needle's eye, and pull it through to the wrong side. Then work the surrounding fabric gently with your fingers to redistribute the slack, and press lightly from the inside. That is the whole repair. It takes five minutes and it is the only method that does not make the damage worse.
A snag in satin feels like a small disaster. The fabric is glossy and unforgiving, so a single pulled loop catches every eye in the room. The good news: most snags are fixable, because the yarn is usually still intact, just displaced. The bad news: the instinctive fix, cutting the loop off, is the one thing that guarantees a permanent hole. To understand why satin snags, see our guide to satin floats.
This guide covers the repair that works, the weave science behind why satin snags in the first place, how to grade your damage honestly, and how to stop the next snag before it happens.
Why Does Satin Snag So Easily?
Short answer: Satin's shine comes from long floating yarns that skip over four or more cross-threads before locking in. Those unanchored floats are easy for a sharp point to catch and pull out. The same structure that makes satin glossy makes it fragile.
Satin is a weave, not a fiber, and its signature move is the float. In a plain weave, every yarn dives over one thread and under the next, locking tight at every crossing. In a satin weave, the warp yarns float across four, five, or more weft yarns before interlacing once. Light bounces off those long, unbroken runs almost perfectly, which is why satin shines. If this is your question, see our guide to which needle to use for satin. For a closer look, read our guide to satin repair.
But every float is a length of yarn with nothing holding it down. A jewelry prong, a fingernail, a Velcro hook, a cat's claw, even a rough zipper tooth can slide under one of those floats and drag it out of the weave. One tug and you have a loop standing proud of the surface, with slack borrowed from the surrounding fabric. That is a snag.
Denser, heavier satins (duchess, bridal satin) snag less than featherweight charmeuse, because tighter packing gives the floats less room to move. But no satin is snag-proof. If you wear satin, you will eventually snag satin. Plan for it.

What Kind of Damage Is It? Grade It Before You Touch It
Short answer: A snag (short loop, yarn intact) is fully fixable at home. A pull (long loop with surrounding distortion) is fixable with patience. A run (the loop has traveled along a line) is a tailor's job. A tear (yarn broken) cannot be pulled back and needs professional repair.
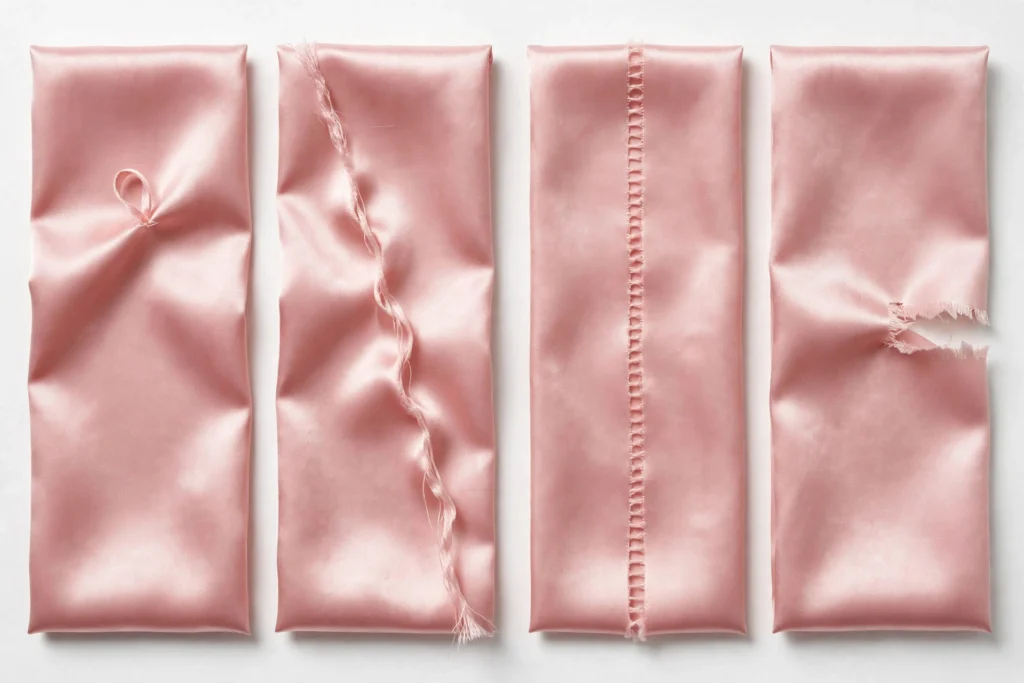
Not all snag damage is equal, and the repair depends on the grade. Look closely before you do anything.
Grade 1: the snag. A single small loop lifted above the surface. The yarn is unbroken. The surrounding weave looks normal. This is the five-minute fix described below, and it works nearly every time.
Grade 2: the pull. A longer loop, sometimes with a visible trail of tightened fabric around it where slack was borrowed. The yarn is still intact, but the distortion is wider. Fixable at home, but it takes slower, more patient redistribution of the slack. Rushing it turns a pull into a run.
Grade 3: the run. The pulled yarn has traveled along its path, distorting a visible line of the weave, like a ladder in stockings. Home repair is risky here. A tailor or reweaver can sometimes work it back, but the odds drop with every row the run has crossed.
Grade 4: the tear. The yarn has actually broken, leaving a hole or a frayed gap. No pull-through technique can fix a broken yarn. Your options are professional reweaving (expensive, worth it only on valuable garments), a decorative patch or applique, or acceptance. Be honest with yourself about which grade you are looking at.
Most satin snags people panic about are Grade 1. Take a breath.
What You Need
Short answer: A fine hand-sewing needle, good light, and patience. That is genuinely the whole kit.
- A fine, sharp needle. On delicate satin, ordinary needles are too thick to push through the tight weave without leaving a mark. Use the finest needle you have, a size 10 or 11 sharp. Threads Magazine's tailors warn that standard crochet hooks and needles damage fine textiles, so smaller is better here.
- Good light. You are working with a single thread. A desk lamp or a bright window beats overhead lighting.
- A pressing cloth and iron. For settling the repair afterward. Low heat for polyester satin, per our ironing guide.
- Optional: a snag-repair tool. Products like the Snag-Nab-It are small loop tools made for exactly this job. They work, but a fine needle does the same thing for free.
Do not reach for scissors. They have no role in this repair.
How to Fix a Snagged Satin: The Pull-Through Method

Short answer: Thread the snag through a needle's eye, pull it to the wrong side, redistribute the slack with your fingers, press from the inside. Never cut.
Work on a flat, clean surface. Take your time. This is a five-minute job that becomes a thirty-minute job if you rush it.
- Stop wearing the garment. Every movement risks catching the loop again and upgrading a Grade 1 snag to a Grade 2 pull. Lay it flat, right side up.
- Find the snag's base. The loop sticks up, but it emerges from two points in the weave. Identify exactly where the yarn dives back in. That is your target.
- Push the needle through beside the base. Insert your fine needle from the right side to the wrong side, as close to one base point as you can, with just the eye and a little of the shaft showing on top. On tight satin weaves, ease it between yarns rather than forcing it through one.
- Thread the snag through the eye. Catch the loop with the needle's eye. If the loop is tiny, use tweezers to feed it through.
- Pull the loop to the wrong side. Draw the needle through slowly and steadily. The snag slides to the back of the fabric. Do not yank. A smooth, even pull moves the loop without borrowing new slack.
- Check the right side. The loop should be gone from the face. If a faint dimple remains where it was, that is borrowed slack, not damage. Move to step 7.
- Redistribute the slack. This is the step most guides skip, and it is the one that makes the repair invisible. With clean, dry fingers, gently stroke and stretch the fabric around the spot in every direction, working the slack back into the surrounding weave. A professional seamstress with twenty years of experience calls this the only method that truly works on satin: keep adjusting the fabric in different directions until the threads settle back into position.
- Press from the wrong side. Lay the area face-down on a pressing cloth and press lightly with a cool-to-low iron. The heat relaxes the yarns into their restored positions. Never press the glossy face directly.
If the loop reappears after step 7, you pulled slack from the wrong direction. Repeat the redistribution more slowly, working outward from the spot in small circles.

What Never to Do to a Snag
Short answer: Never cut it, never pull it from the front, never rub it, and never attack it with heat first.
Do not cut the loop. This is the big one. Cutting a snagged yarn severs it, and a severed yarn cannot be redistributed. You trade a fixable loop for a permanent hole. Every tailor and every repair guide agrees on this, and it is the most common way people turn a five-minute fix into a ruined garment.
Do not pull the loop from the right side. Tugging the loop outward borrows more slack from the weave and lengthens the damage. All pulling happens toward the wrong side, gently.
Do not rub the area. Rubbing crushes satin's smooth face into a dull patch and can felt the yarns together. Stroke and stretch, never scrub.
Do not iron the snag flat from the face first. Heat sets distortion in place. Press only after the loop is through and the slack is redistributed, and only from the wrong side with a cloth.
Do not use clear nail polish on satin. This old sweater trick leaves a stiff, shiny spot that shows on satin's glossy face. It belongs on knits, not on satin.
When a Snag Cannot Be Fixed at Home
Short answer: Grade 3 runs and Grade 4 tears need a professional. Know when to stop.
If the damage is a run that has traveled across multiple rows, or the yarn is broken, home methods run out. A reweaving specialist can sometimes rebuild the area thread by thread. It is slow, skilled work, and it costs accordingly. Worth it for a wedding dress or an expensive gown. Not worth it for a fast-fashion top, where the honest answer is a decorative patch, strategic tailoring that removes the damaged panel, or replacement.
A good tailor will tell you straight whether your piece is a candidate. Ask before you pay. And if you are buying replacement fabric for a repair or a remake, our fabric by the yard guide covers how to match weight and fiber.
How to Keep Satin From Snagging in the First Place

Short answer: Manage the sharp things: jewelry, nails, Velcro, pets, and rough surfaces. Store and wash satin like the delicate fabric it is.
Prevention is a system, not a tip. Snags come from contact between satin's exposed floats and something sharp or rough. Remove the contact and you remove most snags.
Jewelry. Rings with high prongs, bracelets with clasps, and necklaces with rough closures are the number one cause of satin snags. Put jewelry on after you dress, and take it off before you undress. If a piece has sharp edges, it does not belong near satin.
Nails and hands. Long or rough nails catch floats when you smooth the fabric. Keep nails smooth, and handle satin with flat palms rather than fingertips.
Velcro and rough fasteners. Velcro hooks are purpose-built snag machines. Keep satin away from Velcro closures on bags, shoes, and other garments, in the closet and in the wash.
Pets. Cat claws go through satin like nothing. If you share furniture with a cat, keep satin garments hung up and satin bedding covered during the day.
Washing. Machine agitation is a snag factory: the drum, zippers, and hooks on other clothes all attack the fabric. Hand wash satin, or machine wash inside a zipped mesh laundry bag with nothing rough in the load. Our full washing guide has the per-fiber details.
Storage. Hang satin on padded hangers, never on wire or clip hangers that pinch and stress the weave. Give each piece space so it does not rub against rough neighbors. Folded satin should rest between sheets of tissue, not under a stack of denim.
Sewing and handling. If you sew satin, pin only inside seam allowances and use a fresh fine needle. Dull or thick needles punch holes that behave like tiny snags. Our sewing guide covers the rest.

Satin Snag FAQs
Can you fix a snag in a satin dress?
Yes, in most cases. If the yarn is unbroken, thread the snag through a fine needle and pull it to the wrong side of the fabric, then work the surrounding weave with your fingers to redistribute the slack and press lightly from the inside. Never cut the snagged thread.
Should I cut a snag out of satin?
No. Cutting severs the yarn and turns a fixable loop into a permanent hole. Pull the snag through to the wrong side instead. Scissors have no role in snag repair.
Can you pull a snag through satin?
Yes, that is the correct repair. Push a fine needle through the fabric right beside the snag's base, thread the loop through the needle's eye, and draw it through to the back. On delicate satin, use the finest needle you have so you do not mark the weave.
Will steaming fix a snag in satin?
Steam alone does not fix a snag, because the displaced yarn stays displaced. Steam helps after the repair: once the loop is pulled through and the slack redistributed, light steam or pressing from the wrong side settles the yarns back into place.
How do you stop a snag from getting worse?
Stop wearing the garment immediately and lay it flat. Do not touch, pull, or rub the loop. Every movement risks catching it again and lengthening the damage. Repair it with the pull-through method as soon as you can work in good light.
Can a tailor fix snagged satin?
A good tailor can fix snags and pulls, and a reweaving specialist can sometimes repair runs and small tears thread by thread. Reweaving is expensive and worth it only on valuable garments. Ask for an honest assessment before committing.
Does snagged satin always show the repair?
A Grade 1 snag repaired with the pull-through method and proper slack redistribution is usually invisible. Larger pulls may leave a faint trace depending on the fabric and the light. Full restoration is not always possible, which is why prevention matters as much as repair.

—
Why trust this guide: Satin Universe sells nothing and takes no commission on repairs, so there is no incentive to oversell any method. The pull-through technique is the consensus of tailors and repair guides, the weave science is real, and the limits are stated honestly. If you spot an error, we want to hear about it.
Related reading: how satin weave works, how to sew satin, washing satin per fiber, what satin actually is.


